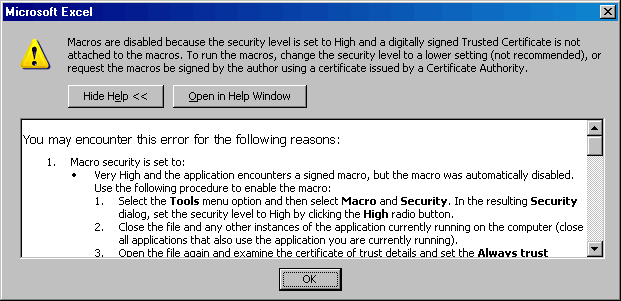
You will need to open that spreadsheet in Excel and enable the macros. When you open the spreadsheet, you will get this window:
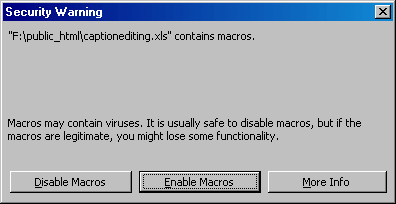
You want to click the Enable Macros button.
This method has only been tested on Photoshop version 7.0. It may not work with other versions of Photoshop.
Check out this example from my autumn trip to Acadia National Park. (link opens in new window)
Most of the hard work is done by the Web Gallery generator in Adobe Photoshop. However, I have developed my own template and my own captioning tool since I really disliked the way they do captions. You'll need to have Photoshop in order to generate a gallery using this method. (If you don't have it on your computer and you are affiliated with Bates College, check out some of the campus computer labs.)
Here are the steps to creating your captioned photo gallery:
Step 1: Choose your images.
Step 2: Arrange your images.
Step 3: Get Brian's gallery template.
Step 4: Start Photoshop.
Step 5: Set your gallery options.
Step 6: Create your gallery.
Step 7: Download Brian's Excel spreadsheet.
Step 8: Open the spreadsheet (a.k.a. dealing with macros)
Step 9: Recaption your photos.
Step 10 (optional): Change the gallery background.
Step 11: Put your gallery online.
Step 1: Choose your images.
Put all of the pictures that you'd like in a single folder on your
computer. The order of the photos in the gallery is alphabetical based on file
name. My digital camera numbers the photos chronologically, which is a
good start, but occasionally I will rename files in order to change the order.
Step 2: Arrange your images.
Make sure that all of your pictures are rotated in the proper
orientation. Also, now is the time to do any cropping or other
adjustments. No need to worry about size yet.
Step 3: Get Brian's gallery template.
Download this template (right click,
save target as...). It is a zip file with the custom template I've
created. You need to unzip the files into the "WebContactSheet" folder of
your Photoshop installation. By default, this folder is
C:\Program Files\Adobe\Photoshop 7.0\Presets\WebContactSheet. Make sure
to check the "Use Folder Names" option when you extract the files so that a
"Table-Brian" subfolder is created.
Step 4: Start Photoshop.
Load Photoshop and go to File: Automate: Web Photo Gallery.
Under the Style dropbox choose "Table-Brian". In the folders section,
choose your folder of images using the Browse... button and choose a BLANK
folder using the Destination... button. This blank folder will soon
contain your photo gallery. (You can create a blank folder after you click
on the Destination... button.)
Step 5: Set your gallery options.
Configure your options on the Web Photo Gallery window. Here
are the settings I recommend:
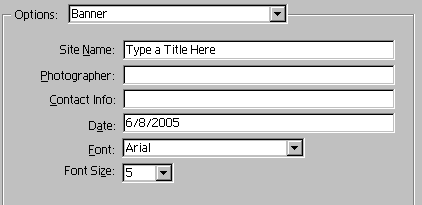
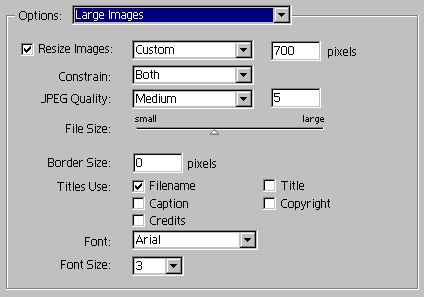
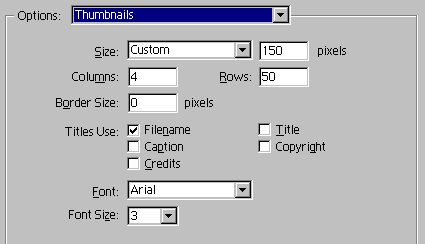
You may choose whatever sizes you like for your large images and thumbnails, but it vital for your captions that you choose "Filename" as the title for both your large images and your thumbnails.
Step 6: Create your gallery.
Click OK and watch Photoshop create your photo gallery. It will
open your new gallery in a browser when it is done. If there are any
problems with the pictures or gallery options, now is the time to change them.
You can simply recreate the gallery and it will make any changes that you like,
including adding or removing photos, reordering your images, etc.
Step 7: Download Brian's Excel spreadsheet.
When you are happy with how your gallery looks, it's time to deal
with the captions. All of your captions are the word "replace" followed by
each image's filename. Download this Excel
spreadsheet (right-click, save target as...) to recaption your photos.
Step 8: Open the spreadsheet (a.k.a. dealing with macros)
You will need to open that spreadsheet in Excel and enable the
macros. When you open the spreadsheet, you will get this window:
You want to click the Enable Macros
button.
If you do not get this window, you probably got something like
this instead:
In order to enable macros in this situation, CLOSE THE SPREADSHEET
(File: Close).
Then, in Excel, go to Tools: Macro: Security and change the security setting to Medium,
like this:
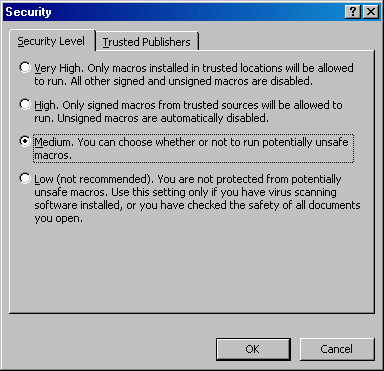
Now try to reopen the spreadsheet.
Step 9: Recaption your photos.
Follow the directions in the spreadsheet for finding your index.html
file in the folder that you chose as the destination of your photo gallery in
Step 4. Type new captions for your images. I recommend having both
Excel and a browser with your thumbnail page open at the same time so that you
can alt-Tab between them to see which caption goes with which picture.
Follow the directions in the spreadsheet for updating your gallery with your
captions.
Step 10 (optional): Change the gallery background.
If you like, you may change the background image from the
default textured gray image. The background image is located in the
"images" subfolder of your destination folder and is called "background.jpg".
Any image with this filename in this folder will be your background image. You may edit or replace this with a background that you like better. You
can try to do a Google
image search to find suitable background images (include the word "tile" in your search if
you want to find images that are designed to tile well.) Alternatively you
can create your own image by shrinking and reducing the contrast of one of the
photos in your gallery. You will probably have to reduce the contrast
quite a bit so that your captions are legible. Check out
my Europe 2004 galleries for some examples.
Step 11: Put your gallery online.
Copy your destination folder and all subfolders and files to your
web server. (If you are a Bates student, this is the public_html folder on
Paris. Click here
to learn how to set up your Bates web server.) The address of your photo
gallery is simply the folder name on your web server. For example, if my
destination directory is called "acadiafall04" then the web address of that
gallery on my web server is
http://abacus.bates.edu/~bpfohl/acadiafall04. You may change the
destination folder name after your gallery has been generated.
Have fun! If you use my template and captioning tool, I'd love to hear about it! Send me a link to your photo gallery at bpfohl@bates.edu. You may also contact me with questions or suggestions.
Return to Brian Pfohl's homepage.