Step 14: Importing your data
These instructions will help you get your data in an Excel file, which is the best application for organizing your raw data. From that point you may either do your analysis in Excel or see the further instructions below to get them in SPSS.
If your data are in an online text file
After you've gotten some responses to your survey, you can import your results file into Excel or SPSS for analysis. Your data will be saved in a text file called mysurvey_results.txt in the same Paris folder where you placed your other project files. (The "_results" suffix might be different if you changed it in the Finish tab.) It may not look like much when you open the text file, but it is tab-delimited which is a perfect format for Excel to work with. Whether you want to do your analysis in Excel or SPSS, you should import the data into Excel first. Here's how:
- Open Excel.
- Choose File: Open. In the dropbox where it says what kind of file it's looking for, choose all files.
- Navigate to the directory where your results.txt file is located and open it. (It is on Paris.)
- Since you are opening an non-Excel file, you will see a dialog asking you what it should do with the file. The two options are "fixed width" or "delimited". You want delimited (the default).
- Choose next. The next screen will show you the various delimiters. Tab is the default and that is what you want. You should see a small window with your data making more sense now. Make sure the "Treat consecutive delimiters as one" checkbox is NOT checked.
- Click Next.
- Click Finish.
- Your data are now organized in Excel. The first row are the variable names, listed in alphabetical order (not the order that they appear on your questionnaire). Each row below corresponds to the responses from a single participant.
- Delete the first row of data (but not the variable names!). Remember that you entered fake data to prime the data file.
- Save the file as an Excel file. Go to File: Save As... and make sure that the file type is Excel not text. You don't want to overwrite or alter your results.txt file.
Random assignment information: If you have enabled random assignment, your data from each condition will be in a separate data file. You should go through the above import procedure for each one. If your variable names are all the same for each condition, you can simply copy and paste data from your different conditions into one Excel spreadsheet. There will be a variable named "cond" which will store which condition each subject was in.
If your data are emailed to you
You will receive an email as soon as each participant completes your survey. You will need to collect all of your responses into a single Excel file. You can do this as you receive each email, or wait until you have several emails and import them all at once. It is strongly recommended that you test out this procedure with some of your initial emails to make sure that everything is working properly.
To deal with your data most efficiently, the recommended procedure has three basic stages: 1. Create your excel file; 2. Reconfigure your merge.txt file; 3. Import your participants' data. Here are detailed instructions for each of those stages
Create your Excel file
- Open one of your data emails which you know contains every variable name. The one that you sent yourself when you tested your survey is best.
- In your email editor, select the entire body of the message and copy it into the clipboard.
- Right click on cell A1 and choose Paste Special. A window will open allowing you to paste your data as Text. Choose OK.
- Your data will paste into rows 1 and 2. The first row are your variable names, while the second row contains your participant's responses.
- Depending on your email editor, your pasted data will take one of two forms. If your data span multiple columns and each variable name has its own column, then you are ready to skip down to the second stage titled "Reconfigure your merge.txt file" If your data are all grouped in column A, then continue with the remaining steps in this stage to format your data correctly. Here is an example of each of these two possibilities using a simple data file with three variables:
- Highlight the cells containing data that need to be reformatted. (Do not highlight more than a single column.) From the Data menu, choose "Text to Columns". (In Excel 2007, this option is on the Data ribbon in the Data Tools section.) This will open the Text to Columns wizard.
- On the first step of the Text to Columns wizard, choose "Delimited" and click Next.
- On the second step of the wizard, uncheck all delimiting options except for Other. In
the field next to the Other option, type the pipe symbol "|". (The pipe
symbol shares the backslash key directly above the Enter key on a standard
Windows keyboard. Hold shift while typing backslash.) Also make sure
that the "Treat consecutive delimiters as one" option is NOT checked. Your
screen should look like this:

(Excel 2007 is arranged slightly differently, but contains all of the same elements.) - Click Finish. Both rows of information are now distributed across however many columns you need to represent one variable per column. Each response is lined up under the appropriate variable name.
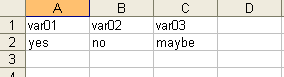 | 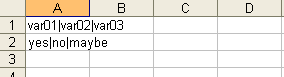 |
| Correctly formatted. Proceed to the second stage. | Not correct. Follow steps 6-9. |
Reconfigure your merge.txt file
Each subsequent email will contain all of the variable names and the participant's responses. Now that we have the variable names in an Excel file, it is unnecessary to have them sent with each email. To configure your survey so that it only sends you the responses, you can reconfigure your merge.txt file as follows:
- On a Windows PC, double click on the file SendValuesOnly.bat in the survey directory on Paris. This will reconfigure your merge files automatically.
- To change your configuration back so that both variables and values are being sent in each email, double click on the SendVariablesAndValues.bat file.
Import your participants' data
As you receive each email, you can import each participant's data using similar instructions to the first stage:
- Open the email containing data. Select the entire body of the message and copy it into the clipboard.
- Open the Excel file that you started in the first stage. Select the first cell of the next blank row. You will be adding each participant as a new row in this file.
- Right-click on the selected cell and choose Paste Special. A window will open allowing you to paste your data as Text. Choose OK.
- As above, your data may paste with the proper formatting, or you may need to use the Text to Columns feature. See steps 6-9 in the stage titled "Create your Excel file" above for detailed instructions. If your data are pasting with the proper formatting, you may try the normal Paste feature (instead of the Paste Special option) to see if that simpler method also works.
- Use the above procedure to copy and paste data from all of your participants' email messages until you have transferred all of your data into this Excel file. Keep the old emails archived in case you need them in the future. If you are importing data from multiple participants at the same time, you can wait to do the Text to Columns conversion on all rows simultaneously instead of one at a time.
Tip: You can configure filters in Bates webmail to collect all of your survey messages in a different folder from your Inbox. This prevents them from cluttering your Inbox and organizes them all in one place so that they can all be easily located when you are ready to import them to Excel. Simply click the Filter icon and create a new rule looking for your survey name in the subject line of the emails you receive.
Once you have all of your data in Excel (using either method)
If you want to do your analysis in Excel, you are ready to proceed. If you would like to import your data into SPSS, here's how:
- If you haven't already done so, follow the instructions above for importing your text file into Excel and saving your data as an Excel file.
- Close the Excel file if it's still open. (You will get an error when importing if you ignore this step.)
- Launch SPSS and choose File: Open->Data.
- Choose files of type XLS and navigate to the Excel file's location.
- When you open it, the default prompt will ask you if you want to covert the first row worth of data to variables. You do. Choose OK and you will now have your data in SPSS and the variables will be created for you.
A note about importing SPSS variables: As you name your variables in the Online Survey Generator spreadsheet, it is recommended that you follow SPSS variable name rules. SPSS will not allow variable names to begin with a numeral. If you have variable names that are not allowed in SPSS, your data will still be imported. A generated variable name will be assigned (such as "var001") and the disallowed variable name will be used as the Label for that variable so that you can still sort things out.
A note about importing checkboxes (from the question type "Multiple Choice (Choose Many)"): Although checkboxes are grouped together to form a Multiple Choice (Choose Many) question type, each checkbox is stored as a separate variable. The variable names will be your variable name plus the suffix "__chkbox001", "__chkbox002" and so on for each checkbox. They will be numbered in the order they appear on your survey. There are two possible ways that your checkbox data will appear in your data file:
1. If your survey is only a single page or if you checkbox question is on the final page of a multipage survey, the responses will be coded as "on" if the box was checked and as a blank if the box was not checked.
2. If your checkbox appears on any page besides the final page of a multipage survey, the responses will be coded as "TRUE" if the box was checked and "FALSE" if the box was not checked.
| Back to the previous step | On to the next step |